Showing posts with label stretching your supplies. Show all posts

Tuesday, November 17, 2009

Christmas Cards from Scraps

Are you one of those crafters that cannot bear to part with even one small leftover scrap of paper, or a scrap piece of ribbon "that I might work into another project"?  If so, I'm glad I'm not alone!  Ha!  The holidays are a great time to make use of those scraps and create beautiful holiday cards.  Cards make a perfect canvas for trying out new techniques without worry of ruining an entire two-page scrapbook layout.  An added bonus is not having to spend extra money on holiday cards this year.  We're also sure those who receive your cards will love having a handcrafted creation made just for them!  Here are a few we came up with using scrap papers and notions:


Ideas to note:  Use holly leaves from old Christmas decor and buttons as berries.  Since it's a card, you don't have to worry about archival safety.  You can also cut out scenes from paper (like the sledding dogs), attach it to scrap chipboard then mount on pop dots for a unique card embellishment.


Ideas to note:  Who says Christmas cards have to use Christmas paper?  You may recognize the script paper as one from 7 Gypsies from a few years ago.  Another technique is to use your cool border punches to create a visual design element (like the red strip above) on your card.


Ideas to Note:  If your paper is a printed image on a white paper (such as the Santa), color it in with chalks or ink.  This also works well with papers printed to look like newpaper ads.  Tying thin twine scraps through buttons gives your projects a vintage feel.


Ideas to Note:  Cover chipboard shapes with paper to create cute embellishments like this snowman.  And don't forget to raid your button and ribbon stash to find the perfect "clothes" for him to wear!  (You may recognize these scrap papers as the Cosmo Cricket Christmas line from a couple of years ago.  Still so pretty!)

Sunday, November 8, 2009

Holiday project tips

The holidays are the perfect time to get more from your scrapbook supplies!  We used the beautiful Christmas/winter product lines from Melissa Frances just to see how many tips we could find to share with you. Our first project was this Christmas layout:


  • Tip #1--Add pearls or jewels to chipboard elements to give them some spice.  The glittered chipboard holly leaves were nice as is, but adding the pearls helps it really stand out.


  • Tip #2--Create embellishments from the product packaging.  The holly leaves were part of a punch out sheet of glittered chipboard shapes.  The photo corner to the bottom left of the photo was cut from a corner of the glittered chipboard packaging (the part that remains after all the chipboard shapes are punched out of it.)  It perfectly coordinates and didn't cost a thing!


  • Tip #3--Use sandpaper to distress stickers and papers.  The "Holiday Bear" label had a shiny surface and didn't fit the vintage feel of the rest of the layout.  Lightly sanding the top and adding ink makes it fit right in.


  • Tip #4--Use your layout leftovers to make a card:


  • Tip#5--Make a vintage star to use on the card!  Ink the edges of a chipboard star.  While the ink is wet, paint the star with Ranger crackle paint so some of the ink blends into the wet paint.  Using a hairdryer to dry the paint will cause it to really crackle (more than air drying does).  Thread twine through button and tie a bow, then adhere it to the star.


  • Tip #6--Recycle household product packaging to make a COOL holiday gift container. Here's how.  Cover an empty clean cardboard package with patterned paper.  We started with this container:


We added our leftover scraps from the layout and card projects to create this unique package just ready to hold candy or other Christmas gift goodies!

Sunday, June 14, 2009

Rolling, rolling, rolling...

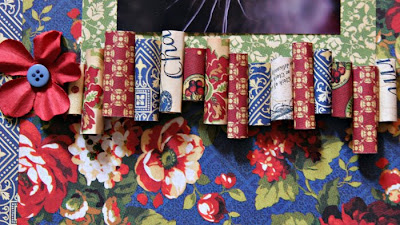
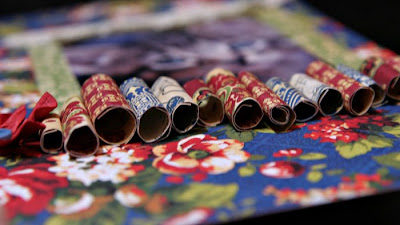
Here's a new technique we've seen and just had to give it a try. Remember those paper beads we used to make as kids? Well who says they can't look great on a scrapbook page or card! On this layout, we used the beautiful vintage papers from Graphic 45. (Who says you can't use beautiful papers like these for a pet page?!!)

To make the rolled paper strips below the leftmost photo, cut small rectangles in various sizes. Roll them into a tube shape and use adhesive to keep them from unrolling. This is a great way to use your scraps to make an inexpensive yet very interesting page or card accents. Here's a closer look:

Hope you'll decide to give it a try!

Sunday, March 29, 2009

Twinkling H2Os

Have you tried Twinkling H2Os on your stamping and scrapbook projects? These are watercolor cakes of shimmery color. All you have to do is add water, dip your paintbrush and watch your project take on a whole new look. When you're finished, simply close the lid. The water evaporates, leaving the ink cake ready to go for your next project. For stamping, these are a great way to add color to a stamped image. Just be sure to use a waterproof inkpad when stamping. On our key album, we started with these lovely white Prima flowers:

We painted a few with a light green Twinkling H2O watercolor ink, and this was the result:


Just imagine all the possibilities with these shimmery "twinkling" watercolor inks!

Sunday, March 22, 2009

Thinking about "Thickers"

Recently while working on a mini album, American Crafts Thickers chipboard letter stickers were the perfect size for the project. Unfortunately the black ones we had didn't match the chosen pink and green color scheme! We decided to try an idea noted in a Creating Keepsakes magazine article by Jennifer McGuire. She suggested peeling off the top layer of manufactured chipboard accents, then changing their color. We started with these chipboard Thickers:
Once added to the mini album, the top layers were carefully peeled off:

Next, a paint dauber was used to paint the exposed chipboard white (Dauber= No mess!) : Once the paint dried, we covered each letter with pink Stickles glitter glue.
Then spread the glitter evenly across each letter and any other matching accents such as the white photo corner:
Take a look at the finished product and imagine it with the original color vs. the altered one:
So much fun we also used it for our album cover!
For some other pages of the mini-album, we had these foam Thickers in white. For this title, chalks were used to tint them light green to match the background paper.

This time, we tinted the white foam Thickers with pink ink, then added pink Stickles glitter. Fun! Hope you'll give some of these techniques a try next time you use your Thickers! Stop back soon to see more techniques from this fun key mini album as well as the completed project.

Sunday, March 15, 2009

Move your scrapbooking to the wall

Ever feel like sometimes you spend time creating scrapbook layouts and then all your work is hidden away in an album on the shelf? Here's a project to get your scrapbooking out in the open for all to see and enjoy! Try shopping your local discount or dollar store for unique photo frames or home decor frames. This one was found on clearance at a local discount merchant for only $4. Even though the picture and the frame color didn't match the current decor, the detail in the frame as well as the glass backing were amazing.

If you would like to alter a project like this, here are the simple steps: first, decide if you are going to leave the frame as is or change the color. For this project, ivory better matches the existing decor. Sand the frame:
Next, paint the wood areas of the frame with acrylic paint. For this project, Making Memories acrylic paint was used. Several coats are needed and care should be taken not to paint the glass areas.
Once the frame is painted, you're ready to create your scrapbook page! Measure the dimensions of the area to be covered and create a scrapbook page using the same dimensions. Attach the page with removable adhesive. This way, you can change the page as often as you desire. Just think how fun it will be to update this project as the seasons change. (The "Home is where the Heart is" saying was created by inking Grungeboard letters for "Home" and "is" then using EK Success letter stickers for "is" "where" and "the".) Take a look at the finished project:
Hope you'll give this a try!

Sunday, February 22, 2009

Quick Card Project

Looking for a quick card using supplies you may already have on hand? This little chickee is made using just a couple of punches and is both quick and fun!

Here's our step by step instructions:

1. Cut and score card background from blue cardstock.

2. Attach Fancy Pants Designs patterned paper to front. We stitched the sides, but it would be just as cute to leave unfinished or use a stitch pattern stamp to duplicate the effect.

3. To make chickee: Punch large circle from yellow cardstock. Punch four heart shapes from dark orange cardstock. Place three hearts behind the top of the circle with the tops peeking out. Cut the last heart in half, with the bottom being a triangle for the beak and the top becoming wings. Add two thin strips of green cardstock for legs and a button for the eye.

4. Stamp sentiment with blue ink on white cardstock strip. Tie ribbon in knot and glue to card.

If you have ideas for quick card ideas using punches, we'd love to share them here on our blog. Just email a photo to us here.

Monday, December 22, 2008

"Recycled" Snowman

Looking for ways to make your scrapbook supplies go farther... or maybe looking for ways to be more "green" and recycle whenever you can? Well this winter fellow may be just the guy you're looking for! We've seen these cute snowmen on various blogs and internet galleries so we wanted to show you the steps to make one of your own. You'll be surprised at how quick and easy it is!


Start out with an empty Prima flower bottle. The Prima flower containers come in so many cute shapes and sizes, any of them will make a great "body."

Remove the Prima sticker from the Prima bottle.

Next, trace the shape of the jar lid onto a stryofoam ball. Use a craft knife to cut out a space to insert the lid, being careful not to cut yourself.
Using a strong liquid adhesive such as Crafter's Pick, glue the Prima bottle lid into the niche you created in the stryofoam ball. Coat the stryofoam ball with the same liquid glue or a decoupage medium (e.g. Mod Podge), then sprinkle the stryofoam ball with white glitter.
Fill the base with festive items. We used a holly sprig and some tinsel. You could also use jingle bells, marbles, beads, Prima Christmas flowers, a photo or whatever you decide!
Next create your jolly fellow's face. We used buttons for eyes, a snip of the holly sprig for the nose and created the dots for the smile with a black marker. You could also use brads, eyelets or beads. Of course, every snowman needs rosy cheeks, so blush those in with a touch of pinkish ink.Make a cone from scrapbook paper for the hat. We used wintery silver patterned paper from Pink Paislee. Glue the cone to stryofoam head. Trim with ribbon or lace. You can also attach a pom from a snip of pom pom trim at the top. Add a ribbon scarf and adorn it with whatever you wish. We used a Melissa Frances glittered chipboard snowflake layered with a Prima flower and a jewel brad. You could also use rub-ons to decorate the outside of the bottle with swirls, a festive phrase or even some snowflakes. If you make one of these, remember to take a photo and email it to us. We'd love to see what you come up with and you may find your own friendly snowman featured on our blog!

Be sure to stop by again soon. We've got more last minute Christmas ideas for you including a quick and easy ornament as well as some ideas for gift card holders.