Showing posts with label fun techniques to try. Show all posts

Sunday, December 6, 2009

Santa's wish list

Don't forget to send your Santa in to shop for all the favorite scrapbookers on his list!  We've got lots of great gift ideas and if you'd like us to point him in a certain direction for you, just let us know!!  For the extra good crafters, Santa might want to consider giving the gift of an entire weekend of scrapbooking with us from January 15-17 at the beautiful French Lick Resort.  If you've never been, the resort is a treat in itself.  Built in the early 1900s, this hotel has a rich history and retains all of its glorious heritage.  Online registration begins December 10.  Check out their website here.  Hope you can join us!

We also wanted to share this Prima canvas album we created to house this year's Christmas photos.  Because it comes with both canvas and transparent page protector pages, it provides a great background to try new techniques as well as utilize lots of different textures.  The best part--sewing in the book is completely optional!

Here's a closer look at the cover detail.  To create the Santa embellishment, use a punch out circle from a Graphic 45 Christmas die cut sheet.  Adhere it to a button, then cover it with a clear page pebble.

For the title page, use letter masks to spell a holiday greeting, then spray with Glimmer Mist.  Adding buttons to dot the "I" and adhering ribbon gives it a homespun feel.


Create this cute snowman page by spraying a canvas page with Glimmer Mist.  Paint two chipboard circles with Ranger crackle paint.  Add ribbon scarf, button eyes, pearl smile and a cardstock carrot nose to make your snowman come to life!


On this page, paint the background with acrylic paint and add a cut out from Graphic 45 Christmas paper.  Use your Crop-a-dile tool to punch holes down the entire side of the canvas page.  Tie in ribbons and jingle bells to give your book a true Christmas feel.


Here's another technique to try.  Place a crocheted doily or lace over a canvas page and spray with Glimmer Mist.  The lace acts as a mask and once removed, can also be used as a lovely accent on another page.


Use buttons to create a one-of-a-kind Christmas tree:

A few more photos of the outside:


Sunday, November 8, 2009

Holiday project tips

The holidays are the perfect time to get more from your scrapbook supplies!  We used the beautiful Christmas/winter product lines from Melissa Frances just to see how many tips we could find to share with you. Our first project was this Christmas layout:


  • Tip #1--Add pearls or jewels to chipboard elements to give them some spice.  The glittered chipboard holly leaves were nice as is, but adding the pearls helps it really stand out.


  • Tip #2--Create embellishments from the product packaging.  The holly leaves were part of a punch out sheet of glittered chipboard shapes.  The photo corner to the bottom left of the photo was cut from a corner of the glittered chipboard packaging (the part that remains after all the chipboard shapes are punched out of it.)  It perfectly coordinates and didn't cost a thing!


  • Tip #3--Use sandpaper to distress stickers and papers.  The "Holiday Bear" label had a shiny surface and didn't fit the vintage feel of the rest of the layout.  Lightly sanding the top and adding ink makes it fit right in.


  • Tip #4--Use your layout leftovers to make a card:


  • Tip#5--Make a vintage star to use on the card!  Ink the edges of a chipboard star.  While the ink is wet, paint the star with Ranger crackle paint so some of the ink blends into the wet paint.  Using a hairdryer to dry the paint will cause it to really crackle (more than air drying does).  Thread twine through button and tie a bow, then adhere it to the star.


  • Tip #6--Recycle household product packaging to make a COOL holiday gift container. Here's how.  Cover an empty clean cardboard package with patterned paper.  We started with this container:


We added our leftover scraps from the layout and card projects to create this unique package just ready to hold candy or other Christmas gift goodies!

Thursday, July 23, 2009

Jumpstart your journaling


No doubt your friends and family members each have certain personality traits that make them unique. If you can't take a picture of it, how can you showcase it in your layout? Try this: gather some favorite photos of the individual and write about their special uniqueness.

As an example, my daughter has a very dry sense of humor and often quotes movie lines she thinks are hilarious. To be honest, I don't always "get" the things she finds amusing...but I want to document how endearing it is to me. Even though I don't have a photo of her sense of humor, it's an important part of who she is. In this layout, I discuss her sense of humor and included a movie quote I hear her say almost every day.
Part of this layout features a fun technique we wanted to share. On the left side of the layout, we cut off half of one of these fun Maya Road screens:
Behind different sections, we backed it with coordinating papers from Basic Grey. Hope you'll give it a try!

Friday, July 17, 2009

Canvas album

We've restocked the beautiful canvas albums from Prima so if you didn't get one the first time, now is your chance! These 8x8" albums feature a plain canvas cover with 5 canvas inner pages and 5 transparent page protector-like pages. This is one of those albums where you can really let your creativity go crazy! Here's one we did, and wanted to share some techniques you might like to try.

For the cover, a liquid adhesive was used to attach a crocheted doily. The flowers are some new flower sprays we just got in, also made by Prima. The larger pink Prima roses come in a package of five, and were originally white. We sprayed dark pink Glimmer Mist on a paper towel, then lightly colored the outer rose petals for a subtle look. The title was stamped directly onto fabric and a Melissa Frances key was added for a vintage look.

Here's a look at some of the inside pages.

This page used alphabet masks (cardstock letters or letter stickers would work too) that were sprayed over with alternating pink and blue Glimmer Mists. Once the letters were pulled up to reveal the white canvas, each letter outline was hand stitched. The canvas pages are actually two thicknesses of canvas stitched together with a cotton sheet between them. This allows you to stitch through a single thickness without the stitches showing on the backside.
Another technique we tried was to print the journaling and a favorite photo onto inkjet t-shirt transfer paper and iron it onto the canvas! Outlining the journaling with a permanent marker gives it a more handmade look. Then we added more Prima flowers... and you might recognize the butterflies as ones cut out of our favorite Graphic 45 papers!

The technique used on the canvas page above was to paint directly on the canvas with a Ranger Acrylic Paint Dabber. (On the Prima website, they recommend painting Artist Gesso medium on the canvas to assure the paint doesn't soak through to the other side. It works like a charm. If you want more details on Gesso, email me here.) We also used a cute section of one of our new papers from Cosmo Cricket.

The transparent page protector pages were just as much fun as the canvas ones! We tore doublesided Graphic 45 paper so it would be smaller than the page protector to allow the canvas page next to it to show through. We also decided to put goodies both inside and OUTSIDE of the page protector to give the album a textured feel. On the layout below, the paper and a swatch of lace are inside the page protector. The photo, green photo mat and the Prima flower are all attached to the outside of the vinyl page protector.


The page below features a vintage handerchief placed inside one of the page protectors. A button sewed to the top keeps the page protector closed and prevents the handkerchief from falling out. The photo is adhered to the outside of the page protector.


My personal favorite page of the album is the one below. Since this book features pictures of my mother's childhood, I sewed some found "little girl treasures" that belonged to her into the page protector. If you don't have a sewing machine, you could easily hand stitch or staple in a similar fashion. If you don't like how staples would look, they could be easily covered by gluing ribbon over the top of them. This album works wonderfully for showcasing memorabilia other than photos!
(The charm in the very center says "Forget Me Not")

Hope you'll give one of these canvas books a try! This one has a sewing/vintage theme so it features more stitching and fabric notions, but the possibilities are truly endless. We'd love to see what you create with this album. Just email us a photo and we'd love to share it on the Bloomin' Blog as an inpsiration to others!
Sunday, June 14, 2009

Rolling, rolling, rolling...

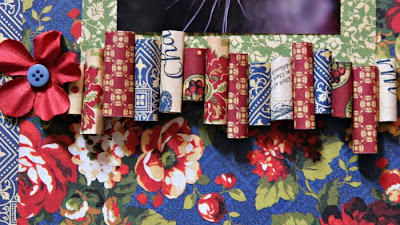
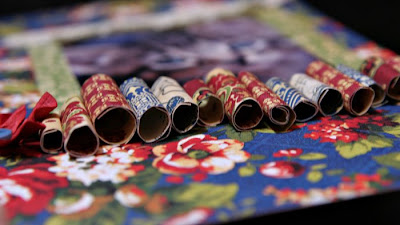
Here's a new technique we've seen and just had to give it a try. Remember those paper beads we used to make as kids? Well who says they can't look great on a scrapbook page or card! On this layout, we used the beautiful vintage papers from Graphic 45. (Who says you can't use beautiful papers like these for a pet page?!!)

To make the rolled paper strips below the leftmost photo, cut small rectangles in various sizes. Roll them into a tube shape and use adhesive to keep them from unrolling. This is a great way to use your scraps to make an inexpensive yet very interesting page or card accents. Here's a closer look:

Hope you'll decide to give it a try!

Monday, May 18, 2009

Scrap-n-$ave---Use your Leftovers

If you're like us, once you finish a project with papers you love, you just can't bear to part with the leftover scraps. Or maybe you've purchased a package of flowers or other embellishments, used a couple, then end up with many unused ones sitting on your shelf. One money saving tip is to "use your stash." Recently we created a mini book using Graphic 45 and Teresa Collins papers. With the leftovers and a few others scraps that were laying around, we created this vintage layout:
Not only did we use up our scraps, but incorporated some new techniques too. Here are just a few ideas for you to try (see photos below):
  1. For the two red flaps on the left of the photo---Use a 5 x 12 inch stip of double sided paper. Cut a 3 inch slit starting about halfway down right side. Fold back the two flaps. Put a pop dot under each flap so it doesn't fold down flat.
  2. Tuck goodies under the flaps! We used some flowers and some leftover tags from our mini-book project.
  3. Scraps with pictures or other designs that can be cut out make great embellishments, such as the clock with wings in the photo below. We cut this out of a leftover scrap, inked it to make it match the other papers better, added a jewel center (again 20 or so in a package!), then put it on pop dots to make it stand out.
  4. Flower centers--using your leftovers is a great way to get creative with flower centers. Here we used a Tim Holtz gear and an extra tag. For one of the flower centers above, we used four mini brads.
  5. Newsprint flowers-- Punch or hand cut flowers from patterned paper. Curl the petals of each flower up by rolling them around a pencil. Ink the edges. Use some of your button stash for the flower center. Put a pre-made paper flower underneath (the Kaisercraft ones come 25 or 50 to a package, so this is a great way to use your extras!)
  6. Photo frame--The photo frame to the right of the photo started out as a white die cut that never seemed to make it onto any projects. We cut the frame into an "L" shape. After inking it to match the rest of the layout, a journaling stamp was used to randomly stamp lines on it. With pop dots underneath, it really frames the photo. And it's barely recognizable from the original!
  7. Stitch your scraps--The script paper scrap at the top of the layout is attached to the page with adhesive. But to make it look more "intentional", create stitches with thread, fibers or twine. It's an easy way to add dimension and visual interest. Try using your leftovers. You might be surprised at the amazing layout you create!

Tuesday, March 31, 2009

Keys to a Happy Home Mini Album

Monday, March 30, 2009

All Cracked Up

Here's another technique from our key album project. We used a chipboard house and heart from this cute set from Maya Road:
The house shape was painted with Ranger distress crackle paint. When the paint dries, it leaves a crackled finish. The thicker the paint, the deeper the cracks will be. One the paint dried, the house was lightly brushed with chalk ink to further accent the crackles. The smaller heart was covered with pink chalk ink and pink Stickles:
The final result:
Hope you'll give this technique a try!

Sunday, March 29, 2009

Twinkling H2Os

Have you tried Twinkling H2Os on your stamping and scrapbook projects? These are watercolor cakes of shimmery color. All you have to do is add water, dip your paintbrush and watch your project take on a whole new look. When you're finished, simply close the lid. The water evaporates, leaving the ink cake ready to go for your next project. For stamping, these are a great way to add color to a stamped image. Just be sure to use a waterproof inkpad when stamping. On our key album, we started with these lovely white Prima flowers:

We painted a few with a light green Twinkling H2O watercolor ink, and this was the result:


Just imagine all the possibilities with these shimmery "twinkling" watercolor inks!